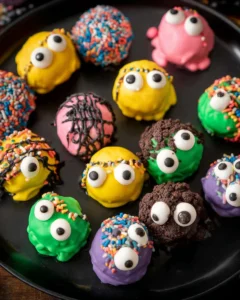
Easy and Spooky Halloween Chocolate Covered Oreos are one of those treats that instantly bring out your inner child. Whether you’re hosting a Halloween party or just looking to add some spooky flair to your dessert table, these chocolate-covered cookies will be a hit. With their simple yet fun design, you can whip up a batch in no time. Plus, kids will love helping decorate them and watching their spooky creations come to life.
What’s great about this recipe is that it calls for common ingredients you likely already have in your pantry or can easily find at the local grocery store. Imagine the joy on everyone’s faces as they enjoy these sweet treats, complemented by their creepy, yet adorable, designs. Get ready to enjoy some quality kitchen time filled with laughter, creativity, and, of course, deliciousness!
Why This Recipe Works
This recipe shines for a few reasons. First, it uses common ingredients that are easy to find, making the process straightforward and accessible. You won’t need to chase down anything exotic, which is perfect for spontaneous baking sessions.
The melting chocolate technique is a game-changer as it ensures a smooth coating on the Oreos. No clumps or mess here! Better yet, the simple decorating steps keep it fun and visually appealing while allowing for creativity. You can create themes that even the most seasoned decorators will appreciate.
These chocolate-covered Oreos are perfect for DIY Halloween party treats or family activities. They bring everyone together in the kitchen, making memories that last beyond the spooky season.
Why You’ll Love This Easy and Spooky Halloween Chocolate Covered Oreos
There are countless reasons to love this recipe. For starters, preparation is quick, allowing you to spend more time enjoying the festivities rather than being stuck in the kitchen. Plus, it’s family-friendly fun; kids love to help decorate, adding their personal touches to your creations.
The combination of chocolate and Oreos creates a deliciously irresistible treat that satisfies sweet cravings. As a bonus, they make fantastic gifts or serve as a festive addition to any Halloween dessert table. Everyone will be reaching for seconds before you know it!

Ingredients
Gather the following ingredients before you start:
- 24 Oreo cookies
- 1 cup of chocolate melting wafers (feel free to choose any color for the base)
- ½ cup of white chocolate melting wafers
- Edible eyeballs (for decoration)
With these simple ingredients, you’re on your way to making some spooky delights!
Preparing the Baking Sheet

Line Your Baking Sheet
Start by lining two baking sheets with wax or parchment paper. This step helps prevent sticking and makes cleanup a breeze. You’ll love how easy it is to just lift off your finished creations!
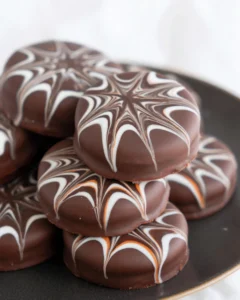
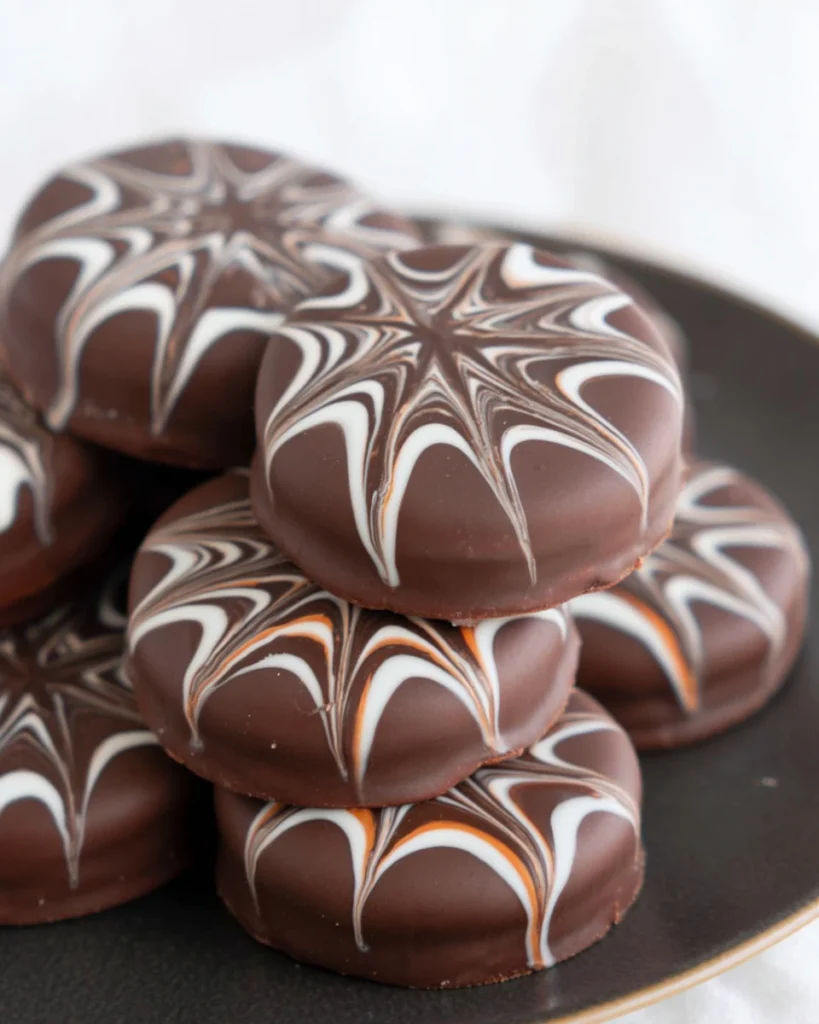
Spider Web Decoration
Melt Chocolate Wafers
Melt 1 cup of chocolate melting wafers in the microwave. Begin with 1 minute, stir well, then heat in 20-second increments until fully melted. Stirring well is the key to getting that perfect smooth texture.
Prepare White Chocolate
While the chocolate is melting, it’s the perfect time to melt ¼ cup of white chocolate melting wafers. Use the same method: start with 45 seconds, stir, then heat in 20-second increments until smooth.
Coat the Oreos
Take an Oreo cookie and dip it into the melted chocolate, ensuring it is completely covered. Use a fork to tap off any excess chocolate gently. This step ensures a thick yet even coating.
Create the Spider Web Design
Place the chocolate-covered Oreo on the lined baking sheet. Grab your piping bag filled with white chocolate and swirl it on top of the cookie. Start from the edge and work towards the center in concentric rings. It might take a little practice, but it’s all part of the fun!
Pull the Web Design
Using a toothpick, begin from the center and pull outward to create those spider web-like lines. Remember to clean the toothpick after each pull to keep the design sharp. Repeat this process with 12 more Oreos, and watch as they transform into spooky masterpieces!
Mummy Decoration
Coat the Oreos
Now, let’s coat another set of Oreo cookies. Follow the same process as before, placing them on the baking sheet to dry. You can never have too many spooky treats!
Melt White Chocolate for Drizzle
Melt ½ cup of white chocolate melting wafers using the same technique as before.
Drizzle White Chocolate
Once the Oreos are dry, use that melted white chocolate to drizzle back and forth across the surface of each Oreo. This creates a simple yet effective mummy look that will impress anyone.
Add Edible Eyeballs
Finally, place some edible eyeballs on top of the drizzle. They’ll really add character to your mummies! Allow the cookies to dry completely, and you’re done.
Tips for Success
To get the best results, ensure the chocolate coating is smooth by stirring well while melting. Also, work quickly with decorations to keep the chocolate from setting before you finish. Have fun experimenting with colored melting wafers to achieve different effects. And don’t forget to admire your work; it’s just so cute!
Variations
Feel free to have some fun with variations! You can use different types of cookies, like chocolate or peanut butter, instead of Oreos. Additionally, adding Halloween-themed sprinkles or other edible decorations can elevate the design and make it even more festive.
Serving Suggestions
When it’s time to share your spooky treats, serve them on a spooky platter for Halloween parties or gatherings. You could also package them in treat bags for a fun alternative to traditional trick-or-treat goodies. Everyone will love taking home some delicious memories!
Storage Tips
To keep your treats fresh, store them in an airtight container at room temperature for up to a week. If you want to extend the shelf life, refrigeration works too, but be sure to bring them to room temperature before serving. This will help retain the best texture for those yummy bites.

FAQs
1. Can I use regular chocolate chips instead of melting wafers?
Yes, regular chocolate chips can be used, but melting wafers usually provide a smoother coating.
2. How long do these Halloween chocolate covered Oreos last?
When stored properly, they can last up to a week in an airtight container.
3. Can I freeze these treats?
Absolutely! They freeze well, but ensure they’re in a tight seal to avoid freezer burn.
4. What can I use instead of edible eyeballs for decoration?
Candy corn, chocolate chips, or colorful sprinkles make great alternatives for decoration.
5. Is this recipe suitable for kids to help with?
Definitely! It’s a fun and interactive recipe, making it perfect for kids.
Easy and Spooky Halloween Chocolate Covered Oreos bring smiles, joy, and a sprinkle of creativity into your celebrations. Why not have a blast making these spooky treats and sharing them with friends and family? Enjoy every bite and create lasting memories this Halloween!
Print
Halloween Chocolate Covered Oreos
These Halloween Chocolate Covered Oreos are an easy and fun treat perfect for parties. With simple ingredients and creative designs, they lead to delightful family moments.
- Total Time: 25 minutes
- Yield: 24 cookies 1x
Ingredients
- 24 Oreo cookies
- 1 cup of chocolate melting wafers (feel free to choose any color for the base)
- ½ cup of white chocolate melting wafers
- Edible eyeballs (for decoration)
Instructions
- Line two baking sheets with wax or parchment paper.
- Melt chocolate melting wafers in the microwave until smooth.
- Melt white chocolate melting wafers similarly.
- Dip each Oreo in melted chocolate, ensuring it is fully covered.
- Place coated Oreos on the baking sheet.
- Decorate with melted white chocolate in a spider web design.
- Drizzle white chocolate on another set of Oreos for mummy design and add eyeballs.
- Allow to dry completely.
Last Step:
Please leave a rating and comment letting us know how you liked this recipe! This helps our business to thrive and continue providing free, high-quality recipes for you.Notes
Stir chocolate well while melting for a smooth finish.
Work quickly with decorations to prevent chocolate from setting.
Store in an airtight container for up to a week.
- Prep Time: 15 minutes
- Cook Time: 10 minutes
- Category: Dessert
- Method: No-bake
- Cuisine: American
Nutrition
- Calories: 120
- Sugar: 9
- Sodium: 50
- Fat: 6
- Saturated Fat: 3
- Unsaturated Fat: 2
- Trans Fat: 0
- Carbohydrates: 18
- Fiber: 1
- Protein: 1
- Cholesterol: 5