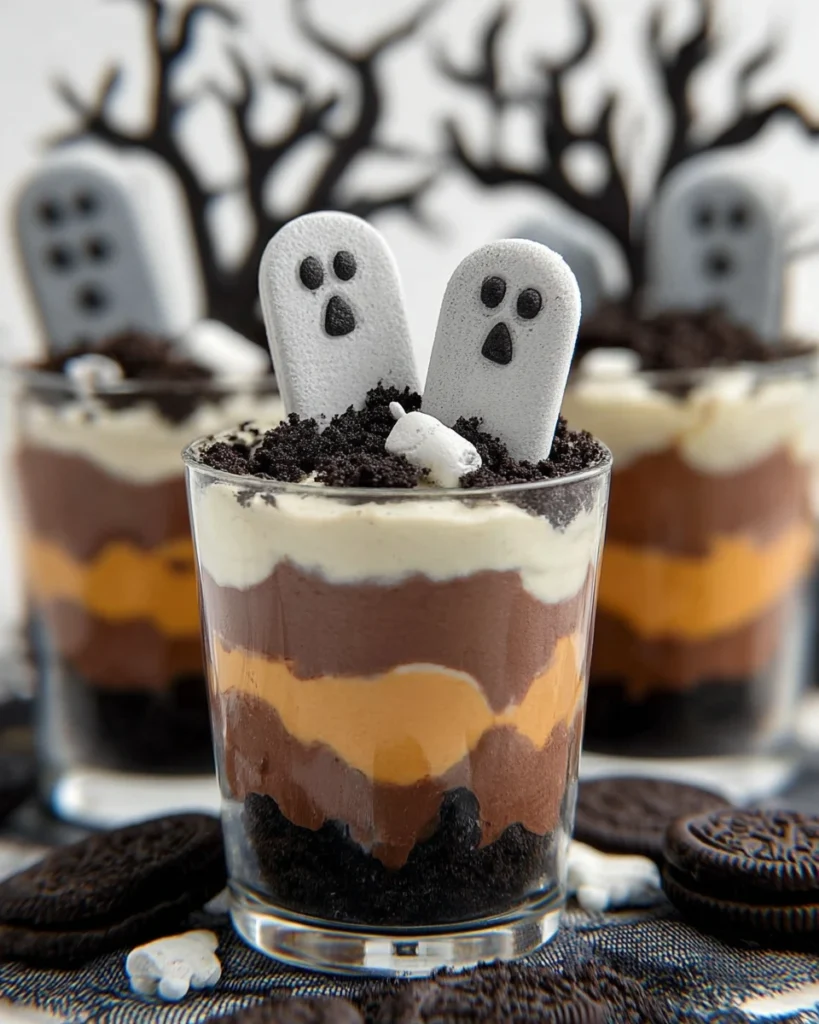
Halloween is a time for spooky thrills, costume parties, and—let’s not forget—the treats! If you’re looking for a dessert that’s both delicious and festive, then Halloween Graveyard Pudding Cups are perfect for you. These delightful cups feature layers of rich, creamy chocolate pudding and crushed Oreos, topped with fun ghostly decorations and tombstone cookies. They’re not only tasty but also visually captivating, making them a fun project to whip together with family or friends. Kids love getting involved in the decorating, and adults will appreciate the yummy flavors too. It’s a treat that’s sure to impress at any Halloween gathering!
As we get into the details, you’ll see that this recipe combines both creativity and ease. Each step is simple, making it perfect for even novice bakers. Get ready to bring a little frightful fun to your holiday celebrations with these Halloween Graveyard Pudding Cups!
Why This Recipe Works
This Halloween Graveyard Pudding Cups recipe combines rich, creamy chocolate pudding with delightful layers of crushed Oreos, creating a delectable dessert that’s as spooky as it is tasty. The use of white chocolate ghosts and Milano cookie tombstones adds an imaginative flair, making it visually appealing and fun for parties. The textures and simple decorations really come together to make this dessert a showstopper.
Why You’ll Love This Halloween Graveyard Pudding Cups
Not only are these pudding cups effortless to prepare, but they also bring a playful spirit to Halloween gatherings. They cater to both children and adults alike, making them a perfect centerpiece for your Halloween dessert table. The combination of flavors and textures will have everyone coming back for more! Imagine children’s faces lighting up as they spot the cute ghostly figures and cookie tombstones.

Ingredients
To create your own Halloween Graveyard Pudding Cups, gather these ingredients:
– ⅔ cup white chocolate, melted
– ½ cup black candy melts, melted
– 6 Milano cookies
– 1 (3.9-ounce) box instant chocolate pudding mix
– 1 ¾ cups cold milk
– ½ to 1 cup crushed Oreos
– Halloween sprinkles (optional)
Create the Ghosts

Melt the White Chocolate
First up, let’s create those adorable little ghosts! Start by melting the white chocolate. Place it in a microwave-safe bowl, and heat it in 20-second intervals. Stir the chocolate in between until it’s completely smooth.
Form the Ghost Shapes
Once your white chocolate is melted, grab a parchment-lined tray. Drop heaped spoonfuls of the chocolate onto the tray. Use the back of a spoon to shape them into ghosts. For added flair, pull some of the chocolate down to create little arms. Once you’re happy with their shapes, stick the tray in the refrigerator until the chocolate sets.
Add the Spooky Details
Pipe the Black Candy Melts
Next, let’s get those spooky faces on our ghosts! Melt the black candy melts according to the package directions. After they’re melted, transfer the candy melts to a piping bag. Now carefully pipe eyes and mouths on each of the white chocolate ghosts. Allow these to harden completely before moving on.
Create the Trees and Tombstones
With the remaining melted black candy, it’s time to create some spooky scenery. Pipe tree shapes onto parchment paper, making sure to give them a thicker base for stability. Let them set fully. You can also pipe fun inscriptions on the Milano cookies to transform them into tombstones.
Prepare the Chocolate Pudding
Mix the Pudding
Get ready for the chocolatey goodness! In a large bowl, whisk together the instant chocolate pudding mix with the cold milk. Stir until smooth, and then let it sit for a few minutes. This allows it to thicken up nicely.
Assemble the Pudding Cups
Layer the Ingredients
Now the fun really begins! In each serving cup, start with a layer of thickened chocolate pudding as your base. Next, sprinkle in some crushed Oreos for that delightful crunch. Repeat these layers, finishing off with a final layer of Oreos atop the pudding. Once assembled, pop the cups in the refrigerator for at least one hour. This helps the layers set even better.
Final Touches
Decorate the Cups
When you’re ready to serve, it’s time for the final touches! Gently insert a Milano cookie into each pudding cup. This will represent your tombstone. Place a white chocolate ghost next to it, and add one of your tree treats in the back. For a little festive flair, sprinkle some Halloween-themed decorations on top.
Serving Suggestions
These Halloween Graveyard Pudding Cups make a fun addition to any event! Serve them at parties, school functions, or casual family gatherings. Pair them with other spooky treats, like caramel apples or pumpkin cookies, for a complete Halloween-themed dessert spread that will have everyone buzzing with excitement.
Tips for Success
- Be careful not to overheat the white chocolate and black candy melts as it can cause them to seize. Keep an eye on them.
- For the best texture, you might want to adjust the amount of crushed Oreos based on how crunchy you want it.
- If you prefer firmer pudding, chill the assembled cups for a longer time before serving.
Variations
Feel free to get creative! Consider these variations for an extra twist:
– Use vanilla pudding instead of chocolate for a different flavor experience.
– Add gummy worms or candy bats for an additional spooky touch.
– Experiment with different cookie types for the tombstones, like chocolate-covered biscuits or shortbread.
Storage Tips
If you happen to have any leftovers, store them in an airtight container in the fridge for up to 2 days. However, it’s best to wait until just before serving to decorate with chocolate ghosts and sprinkles to ensure maximum freshness.

FAQs
1. Can I make these pudding cups in advance?
Absolutely! You can prepare them a day ahead and keep them in the fridge until you’re ready to serve.
2. How can I make the ghosts more detailed?
You could use food coloring to really jazz them up with more intricate designs. Let your creativity run wild!
3. Are these pudding cups suitable for a gluten-free diet?
Yes, just use gluten-free cookies and pudding mix to make this dessert gluten-free.
4. Can I substitute the white chocolate?
While you can, just keep in mind it may change the texture and flavor. Yogurt or a lighter cream alternative can also work well.
5. What type of milk works best for the pudding?
Whole milk will create the creamiest texture, but feel free to use whatever kind you prefer based on your dietary needs.
These Halloween Graveyard Pudding Cups are not just a tasty treat—they’re a delightful centerpiece for any Halloween gathering. Combining the irresistible taste of chocolate with creative presentation, they’re sure to be a hit. Whether serving at a spooky soirée or enjoying with family, these cups will provide a blend of fun and flavor that celebrates the spirit of Halloween! Enjoy making this delicious dessert while creating lasting memories!
Print
Halloween Graveyard Pudding Cups
These Halloween Graveyard Pudding Cups bring a playful spirit to your gatherings. With rich chocolate flavor, simple preparation, and creative decorations, they’re sure to impress everyone.
- Total Time: 30 minutes
- Yield: 6 servings 1x
Ingredients
- ⅔ cup white chocolate, melted
- ½ cup black candy melts, melted
- 6 Milano cookies
- 1 (3.9-ounce) box instant chocolate pudding mix
- 1 ¾ cups cold milk
- ½ to 1 cup crushed Oreos
- Halloween sprinkles (optional)
Instructions
- Melt the white chocolate in a microwave-safe bowl in 20-second intervals until smooth.
- Drop spoonfuls of melted white chocolate onto a parchment-lined tray and shape them into ghost forms.
- Melt the black candy melts and pipe eyes and mouths on the ghosts.
- Pipe tree shapes and inscriptions on the Milano cookies.
- Whisk together chocolate pudding mix and cold milk; let it thicken.
- Layer chocolate pudding and crushed Oreos in serving cups.
- Chill in the refrigerator for at least one hour.
- Decorate with a Milano cookie tombstone, a white chocolate ghost, and trees.
Last Step:
Please leave a rating and comment letting us know how you liked this recipe! This helps our business to thrive and continue providing free, high-quality recipes for you.Notes
Avoid overheating the white chocolate and black candy melts.
Adjust crushed Oreos based on desired crunch level.
Chill cups longer for firmer pudding.
- Prep Time: 30 minutes
- Cook Time: 0 minutes
- Category: Dessert
- Method: No-bake
- Cuisine: American
Nutrition
- Calories: 320
- Sugar: 28
- Sodium: 180
- Fat: 15
- Saturated Fat: 8
- Unsaturated Fat: 4
- Trans Fat: 0
- Carbohydrates: 45
- Fiber: 2
- Protein: 4
- Cholesterol: 30