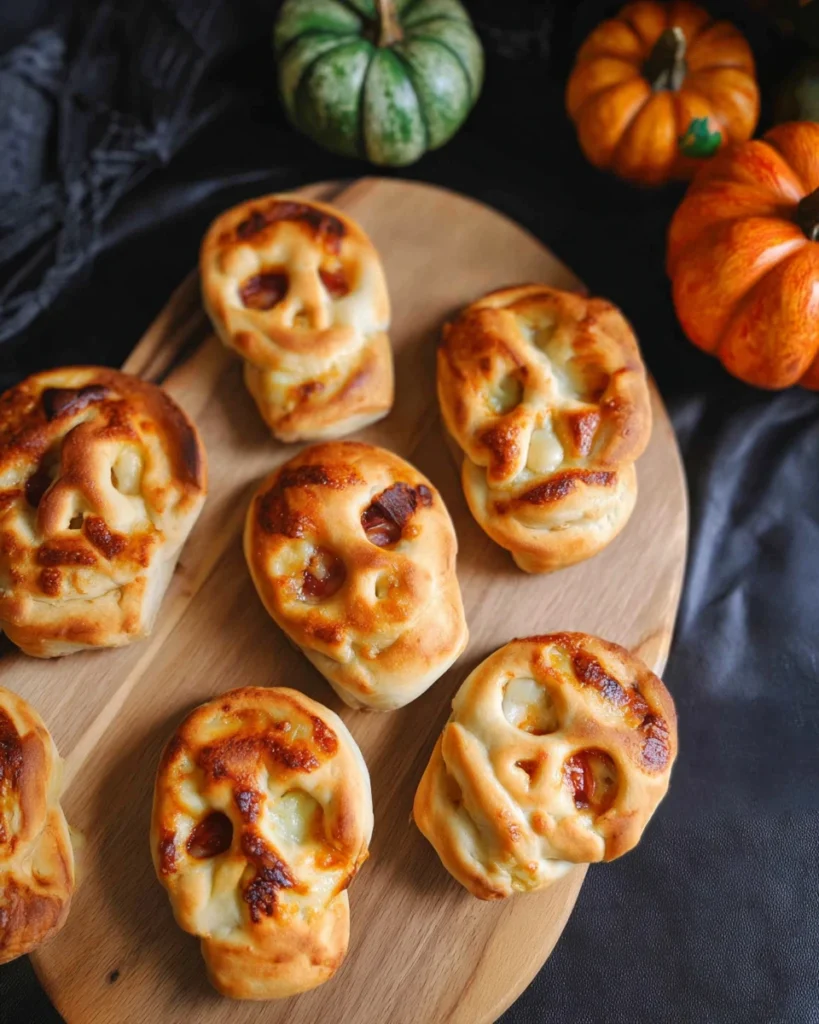
These Pizza Skulls are the perfect blend of spooky and delicious, making them a hit for any gathering! Imagine a crispy exterior that gives way to melty cheese and flavorful toppings—all served in a fun skull shape. Whether you’re preparing for Halloween or just want a good time in the kitchen, these treats are sure to impress. Plus, they’re easy to customize based on your favorite pizza toppings, so everyone can enjoy their own special creation. Let’s get started on making this unique recipe!
Why This Recipe Works
The key to achieving the best Pizza Skulls lies in the combination of warm, activated yeast and flour, which creates a dough with the perfect texture. This dough is strong enough to hold all those delicious fillings without falling apart. Using a skull-shaped mold not only makes these treats visually appealing, but it also ensures that each piece bakes evenly. This results in crunchy edges and soft interiors, making every bite memorable.
Why You’ll Love This Pizza Skulls
These spooky Pizza Skulls are such a fun twist on traditional pizza. They’re perfect for Halloween, of course, but they can also bring joy to any casual get-together. One of the best parts? You can customize the fillings! This means everyone can enjoy their choices, making them ideal for diverse tastes and dietary preferences. Imagine a gathering where both kids and adults can dig into their favorite cheesy, saucy goodness. It’s bound to be a hit!

Ingredients
- 1 cup warm water (95-110°F)
- 1 tablespoon sugar
- 2 teaspoons active dry yeast
- 1 teaspoon salt
- 2½ cups all-purpose flour
- 1 tablespoon olive oil
- 1½ cups pizza sauce
- 2 cups shredded mozzarella cheese
- 1 cup pepperoni, cut into quarters
Making the Pizza Skull Dough

Activate the Yeast
First things first, let’s activate that yeast! In a medium bowl, combine the warm water, sugar, and yeast. Give it a good mix. Then, let it sit for about 5-10 minutes until you see it become frothy. That’s how you know it’s ready to go!
Mix the Dough
Next, add the olive oil, salt, and 1½ cups of flour to that frothy yeast mix. Stir well until everything is combined. After that, gradually incorporate the remaining flour. Do this by adding ¼ cup at a time until the dough starts to pull away from the sides of the bowl. It should come together nicely.
Knead the Dough
Now it’s time to knead! If you have a mixer, mix on low speed for 1-2 minutes until the dough is smooth. Don’t worry if it’s a bit sticky; this is normal. Once smooth, transfer the dough to a floured surface and shape it into a rectangle that fits your skull mold.
Shaping the Pizza Skulls
Prepare the Mold
Let’s get the mold ready! Spray your mini skull baking tins with nonstick cooking spray. This step is important to prevent any sticking, so don’t skip it!
Shape the Dough in the Mold
With floured hands, take some of your prepared dough and stretch it. Press the dough into the mold, covering all the cavities. Make sure it holds well, but be gentle to avoid breaking it.
Add the Fillings
Now comes the fun part—adding the fillings! Spoon about 2 tablespoons of pizza sauce into each cavity. Next, sprinkle ¼ cup of shredded cheese and top it off with about 2 tablespoons of chopped pepperoni. Feel free to get creative with the toppings!
Seal the Skulls
To seal each skull, use kitchen shears to trim any excess dough. Make sure you leave enough to pinch and close the top pocket securely. This step is crucial to keep all the deliciousness inside.
Baking the Pizza Skulls
Bake to Perfection
Preheat your oven to 400°F. Once it’s ready, place your filled molds into the oven and bake for 20-30 minutes. You want them to turn golden brown for that perfect crunch. Keep an eye on them; every oven is a bit different!
Serving Suggestions
When the Pizza Skulls come out of the oven, they should be warm and inviting. Serve them alongside extra pizza sauce for dipping. Pair with a fresh salad or some buttery garlic bread, and you’ll have a complete meal that everyone will love.
Tips for Success
A couple of tips for making your Pizza Skulls foolproof:
– Make sure your water temperature is just right for yeast activation. If it’s too hot, it can kill the yeast.
– Don’t be afraid to experiment! Try different fillings like veggies or sausage for a personalized touch.
Variations
Looking to mix things up? Consider using different cheeses like cheddar or pepper jack for a flavor twist. You can also add diced vegetables, such as mushrooms or bell peppers, to create a heartier filling. The possibilities are endless!
Storage Tips
If you have any leftovers, store those Pizza Skulls in an airtight container in the fridge for up to three days. When you want to enjoy them again, reheat in the oven to maintain that delightful crispiness.
Pairing Ideas
These Pizza Skulls go beautifully with a chilled soft drink or even a spooky-themed cocktail for your Halloween parties. For a little extra flavor, complement them with homemade ranch or garlic dipping sauce.

FAQs
1. Can I make the dough in advance?
Yes, definitely! You can prepare the dough the night before and refrigerate it. Just allow it to come to room temperature before you start shaping.
2. Can I freeze pizza skulls?
Absolutely! Once baked, freeze them, and then you can reheat directly from the freezer whenever you want a quick snack.
3. What if I don’t have a skull mold?
No worries! You can use any shaped mold or even cut the dough into skull shapes and bake them on a baking sheet.
4. Can I use whole wheat flour instead of all-purpose?
Yes, whole wheat flour can be a good substitute, but bear in mind that it may yield a denser dough. You might need to adjust the liquid slightly.
5. What are some creative filling ideas?
Feel free to play around! Add fillings like buffalo chicken, barbecue pulled pork, or vegetarian options like spinach and feta.
These Pizza Skulls are a fantastic way to combine fun and flavor, making them a perfect choice for any occasion. Their crispy outer layer and gooey inside guarantee smiles all around. Plus, the chance to customize fillings means everyone can have a version that suits their tastes. Enjoy your time in the kitchen and happy cooking!
Print
Pizza Skulls
Pizza Skulls are a delightful twist on traditional pizza, featuring a crispy exterior and cheesy interior. Perfect for Halloween or casual gatherings, these customizable treats are sure to impress with their fun shape and delicious fillings.
- Total Time: 50 minutes
- Yield: 12 skulls 1x
Ingredients
- 1 cup warm water (95-110°F)
- 1 tablespoon sugar
- 2 teaspoons active dry yeast
- 1 teaspoon salt
- 2½ cups all-purpose flour
- 1 tablespoon olive oil
- 1½ cups pizza sauce
- 2 cups shredded mozzarella cheese
- 1 cup pepperoni, cut into quarters
Instructions
- Activate the yeast by combining warm water, sugar, and yeast; let it sit until frothy.
- Mix in olive oil, salt, and 1½ cups flour until combined, then gradually add remaining flour until it pulls away from the sides.
- Knead the dough until smooth and shape it to fit the skull mold.
- Prepare the mold with nonstick spray and press the dough into it.
- Fill each cavity with pizza sauce, cheese, and pepperoni.
- Seal the skulls with excess dough, then trim to ensure a secure closure.
- Preheat the oven to 400°F and bake the molds for 20-30 minutes until golden brown.
Last Step:
Please leave a rating and comment letting us know how you liked this recipe! This helps our business to thrive and continue providing free, high-quality recipes for you.Notes
Ensure water temperature is ideal for yeast activation to avoid killing the yeast.
Experiment with various fillings for personalized flavors.
Leftovers can be stored in an airtight container in the fridge for up to three days.
- Prep Time: 20 minutes
- Cook Time: 30 minutes
- Category: Appetizer
- Method: Baked
- Cuisine: Italian
Nutrition
- Calories: 250
- Sugar: 2
- Sodium: 500
- Fat: 12
- Saturated Fat: 5
- Unsaturated Fat: 4
- Trans Fat: 0
- Carbohydrates: 28
- Fiber: 1
- Protein: 10
- Cholesterol: 20